2010年6月15日 星期二
2010年6月7日 星期一
2010年6月6日 星期日
2010年4月14日 星期三
Movement researching and testing~

1.I create the jumping action for my character, so I take some videos for animation reference.
I upload it onto Youtube, here is hte link:
 I will apply the skeleton for my character.
2. Besides, I analysis the jumping action frame by frame, to see how can it move, then drop down the path and the no. of frame. I use Photoshop to make an image in order to check the movement clearly.
 now I can see the moving images.
in this video ,I can see the brid's flying action.
2010年4月7日 星期三
Ass4_Maya Lighting~
In this week, I am going to light up my scene with different kind of CG Light, include point,directional,spot light. The followings is my works.
Mood1 ( sense of mystery)

(pic download from:http://cinemanicchronicles.moviemansguide.com/wp-content/uploads/2009/08/alice_in_wonderland_alice_poster21.jpg)
I want to show the mood as a kind of wonderland, which is something unpredictable and won't appear in the real world, just like the Film poster of " Alice in the Wonderland". The background color is bright,but the surroundings is darken.
Therefore, I use the green picture as my scene's walkpaper, to show a sense of mystery I mainly use green color for those light.

For some objects I don't want them to share the same light together, so I apply the "Relationship Editors - Light Linking" , in order to break the light link connection for some objects.

In the light editor, I assgin the shadow for those items, so that they look like the real one.


This is the final render picture for the Mysterious mood.
Mood2( relaxing moment--In the evening)

I want to create the mood as relexing moment in the evening. As in this period of time, I can see the sunset out my window, and I feel relaxing. I think that at that moment, I can feel the soft sunlight and I can take a look at the sun, since sun shine won't be too bright! 

Mood1 ( sense of mystery)

(pic download from:http://cinemanicchronicles.moviemansguide.com/wp-content/uploads/2009/08/alice_in_wonderland_alice_poster21.jpg)
I want to show the mood as a kind of wonderland, which is something unpredictable and won't appear in the real world, just like the Film poster of " Alice in the Wonderland". The background color is bright,but the surroundings is darken.
Therefore, I use the green picture as my scene's walkpaper, to show a sense of mystery I mainly use green color for those light.

For some objects I don't want them to share the same light together, so I apply the "Relationship Editors - Light Linking" , in order to break the light link connection for some objects.

In the light editor, I assgin the shadow for those items, so that they look like the real one.


This is the final render picture for the Mysterious mood.
Mood2( relaxing moment--In the evening)

I want to create the mood as relexing moment in the evening. As in this period of time, I can see the sunset out my window, and I feel relaxing. I think that at that moment, I can feel the soft sunlight and I can take a look at the sun, since sun shine won't be too bright!
As the mood is warm and soft, so I mainly use orange for the light color.
Such as the cartoon "Brother Bear", the mood is warm and relax.
Such as the cartoon "Brother Bear", the mood is warm and relax.


I try to add the image of sunset for the environment insde the Render Camera.
It helps me a lot for creating the scene, just add a directional light insde the room, I already see the effects through the render camera.

To match the evening mood, I adjust the light color to orange yellow.

To generate the shadow for those objects, I use ray trace shadow because I want to show the details of my glass cup.

 This is the mood of relaxing.


I want to create a scene which is in a dark room at night, but there is some light source come from outside, may be the door or the windows.


Totally I use 4 lights for the whole scene, as the Intensity of light can't be too large, I need to set more lights at different directions. This is the render image of my kitchen in the dark, with the door open slight at the back. Also it shows a lonely mood.

To generate the shadow for those objects, I use ray trace shadow because I want to show the details of my glass cup.


 This is the mood of relaxing.
This is the one before I added the shadows.
Mood3 Lonely in the dark( the scene of night with moonlight outside)
Mood3 Lonely in the dark( the scene of night with moonlight outside)

(pic from: Disney offical website)
I want to create a scene which is in a dark room at night, but there is some light source come from outside, may be the door or the windows.
So I create a spotlight with blue color, that give us a sense of cool and darken.

Then I add a point light to be the light source come from outside, as I find that the point light let the viewers see the light source of the light.


Totally I use 4 lights for the whole scene, as the Intensity of light can't be too large, I need to set more lights at different directions.
 This is the render image of my kitchen in the dark, with the door open slight at the back. Also it shows a lonely mood.
2010年3月24日 星期三
~SHADER in Maya~
This week , I learn more about shader, and now I want to share with you that there are some useful free shaders libaray on the websites, I've download some of them and I try to apply to some simple objects ,then I can see the effects.

 I try to make changes for the shaders,then I get something very interesting~
Credits: There are the websites where I download those shaders for my assignment.(thx lot!)
(P.S. some of them are just aollow their members to download,so if you wish to get it,you need to join them.)
1.wooden shader:
 the original one
 chocolate liked one,i changed the node,and the color

sometimes, we can apply the same shader to different objects.
2.lava shader
 original one
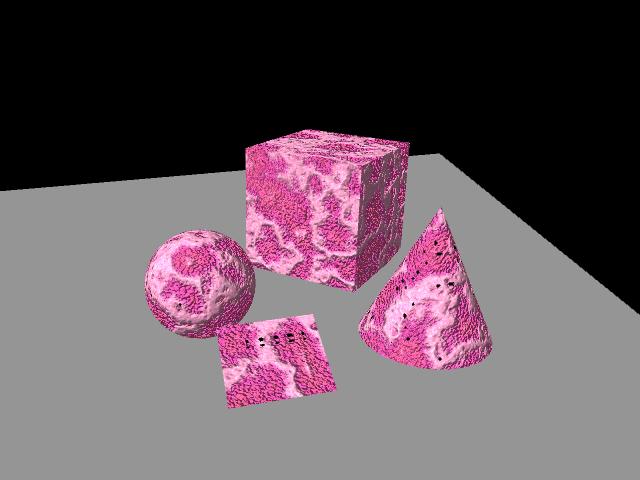
Ice cream liked shader... as the surface is rought,by changing the color, it looks like the ice cream.


Like the moon surface, very rought by adjusting the bump map deepth.
3. circlar pattern shader
 original one
 original one
 by changing the node (2d texture placement)
I got some illusion liked pattern.


something like the Rainbow candy...
4.glass shader
 original one

eye con liked shader,I replaced the texture node as a "Checker", so in the eye con.I got some checker pattern.


the bubble liked shader, I can use the above shader to create my bubble shader.
5.eye ball shader
 original one
5.eye ball shader
 original one
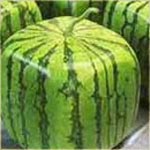
this the watermelon liked shader,as I find the lines pattern like the one on the watermelon,so I change the color,and apply it on those objects, then it looks like the watermelon!


Also the lines can be some thread sew on the cloth, just like running stich.(the photo shown)
2010年3月17日 星期三
Modeling with Polygons and NURBS
I want to create 5 objects which I use daily and put them on my desk.
As I like to make some dolls , so on my desk, there are pin cushion, thread and a pair of scissors , this time I will also model my cup and pencils . By the following steps, I try to tell you how can I model those objects, and I show you my sketch work and the photos of those objects.
PIN CUSHION


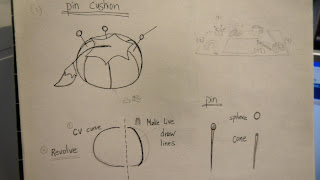
Do the modeling in Maya2009, I started by get a NURBS sphere.
Part A
2.as there are edges around the pin cushion, use "Make the selected object live", then I can draw on the surface of the object.
3.press enter, the curve turn into cyan, now get a NURBS circle and select the cutve to choose Extrude. Now I have one edge of pin cushion, and I need to duplicate curve for the others edges.
Part B
4. The top of pin cushion: I get a cube, and choose "soft select" to move the shape, in order to get a smooth shape of the object. Then group the both part A &B.
Part C
Pins: I get a sphere for the top of a pin, and a cone for the bottom part,as a pin is very sharp, I scale the right size for that.
If the modle is fine, then assign a new Lambert for each part of pin cushion.
Thread roll


For this object I get a polygon Cylinder to build the basic shape.
1. to select the top part face, use extrude to create the middle part of the thread.
2.As the middle part is hollow, then I need to delete the top part of the cylinder.
3.the surface of the thread roll is covered by layers of thread,
so I will select "Make selecte object live" then draw on the surface of the thread roll.
4. get a NURBS circle first, then select the previous curve to Extrude the both items.
or
I make the surface of a thread roll by mapping , to upload the texture of the real thread roll,then map the image onto the object.
Scissors


to a pair of scissors, I start by getting a polygon cube
PartA (upper sharp part)
1. turn to component mode,adjust the vrtex to build the outline shape like the one in my sketch.
2.scale the size to make it fine. And mirror it to be another side.
Part B(handle smooth part)
1. get a cube and smooth it, the you have a basic shape of the plastic handle of the scissors.
2. then get a cylinder, select "Different" under Boolean, in order to create a hold of the plastic handle. Duplicate another side by Mirror.
(or there is another way to do that, use NURBS then edit NURBS by drawing a curve and project curve , follow by using the "Trim tool" to make a hold as the handle hold.)
To assign a materials to each part, upper sharp part is made by iron, ues "blinn".handle is made by plastic, so use "lambert" for it.
Pencils


to model a pencil is very simle,
first get a Polygon Cylinder with 6 subdivision Axis, then extrude the bottom part to make it sharp , also I find that to adjust the vertex, I can decorate the pen point.
well there are different kind of pencils, we can use bump map to decorate the surface of those pencils. As there are words printed on the top of pencils.
Also remember to assign a material to it.
Cup~


1. draw a curve by CV curve uder Create. Press enter the curve turn to cyan color.
2.now choose Revolve to get the cup's shape.
3. draw another curve, then get a NURBS circle, select the circle first and then select previous curve of the cup, to Extrude the both items.----now you get the handle of the cup.
4. to make it like the real, I use mapping to do that.
5.stick the bear cartoon image onto the cup by upload the image from file.
After that,I will delete history, and clear the scene, in order to reduce the file size.
And grouping is also important, as there are more than one object, if no names and group for each item, it will be a mess!
訂閱:
意見 (Atom)