I want to create 5 objects which I use daily and put them on my desk.
As I like to make some dolls , so on my desk, there are pin cushion, thread and a pair of scissors , this time I will also model my cup and pencils . By the following steps, I try to tell you how can I model those objects, and I show you my sketch work and the photos of those objects.
PIN CUSHION
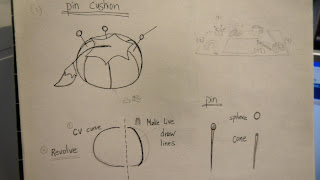
Do the modeling in Maya2009, I started by get a NURBS sphere.
Part A
2.as there are edges around the pin cushion, use "Make the selected object live", then I can draw on the surface of the object.
3.press enter, the curve turn into cyan, now get a NURBS circle and select the cutve to choose Extrude. Now I have one edge of pin cushion, and I need to duplicate curve for the others edges.
Part B
4. The top of pin cushion: I get a cube, and choose "soft select" to move the shape, in order to get a smooth shape of the object. Then group the both part A &B.
Part C
Pins: I get a sphere for the top of a pin, and a cone for the bottom part,as a pin is very sharp, I scale the right size for that.
If the modle is fine, then assign a new Lambert for each part of pin cushion.
Thread roll
For this object I get a polygon Cylinder to build the basic shape.
1. to select the top part face, use extrude to create the middle part of the thread.
2.As the middle part is hollow, then I need to delete the top part of the cylinder.
3.the surface of the thread roll is covered by layers of thread,
so I will select "Make selecte object live" then draw on the surface of the thread roll.
4. get a NURBS circle first, then select the previous curve to Extrude the both items.
or
I make the surface of a thread roll by mapping , to upload the texture of the real thread roll,then map the image onto the object.
Scissors
to a pair of scissors, I start by getting a polygon cube
PartA (upper sharp part)
1. turn to component mode,adjust the vrtex to build the outline shape like the one in my sketch.
2.scale the size to make it fine. And mirror it to be another side.
Part B(handle smooth part)
1. get a cube and smooth it, the you have a basic shape of the plastic handle of the scissors.
2. then get a cylinder, select "Different" under Boolean, in order to create a hold of the plastic handle. Duplicate another side by Mirror.
(or there is another way to do that, use NURBS then edit NURBS by drawing a curve and project curve , follow by using the "Trim tool" to make a hold as the handle hold.)
To assign a materials to each part, upper sharp part is made by iron, ues "blinn".handle is made by plastic, so use "lambert" for it.
Pencils
to model a pencil is very simle,
first get a Polygon Cylinder with 6 subdivision Axis, then extrude the bottom part to make it sharp , also I find that to adjust the vertex, I can decorate the pen point.
well there are different kind of pencils, we can use bump map to decorate the surface of those pencils. As there are words printed on the top of pencils.
Also remember to assign a material to it.
Cup~
1. draw a curve by CV curve uder Create. Press enter the curve turn to cyan color.
2.now choose Revolve to get the cup's shape.
3. draw another curve, then get a NURBS circle, select the circle first and then select previous curve of the cup, to Extrude the both items.----now you get the handle of the cup.
4. to make it like the real, I use mapping to do that.
5.stick the bear cartoon image onto the cup by upload the image from file.
After that,I will delete history, and clear the scene, in order to reduce the file size.
And grouping is also important, as there are more than one object, if no names and group for each item, it will be a mess!

 I try to make changes for the shaders,then I get something very interesting~
 the original one
 chocolate liked one,i changed the node,and the color

 original one
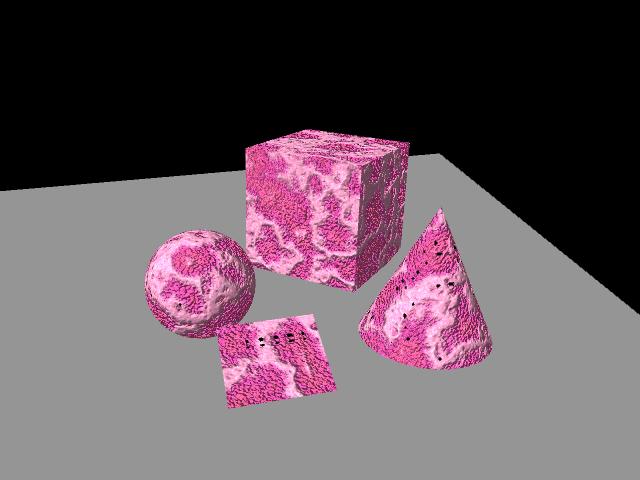


 original one
 original one
 by changing the node (2d texture placement)

 original one


 original one
 original one


 This tutorial is mainly talking about how to use particles to generate afireworks performance. That's something that I haven't learnt before. The tutorial shows the whole work progress step by step.